Wednesday, May 27, 2009

Above Ground Gardening ~

box garden

gardening help

For some time now I've been thinking about building a wooden box to start box-gardening or above ground gardening in a small part of our backyard.

{Building a 3’ x 4’ box – using 1x6’s, purchase one 1x6 that is 8 foot in length, have them cut it in two; purchase one 1x6 that is 6 foot in length, have them cut in two. It was recommended to me that you don’t want a box any wider than 3 feet but you can make it as long as you want.}

I wanted to try it small this year. I’m very happy with the results and can’t wait to watch our tomatoes and basil grow. I plan on having the kids journal the progress of the garden during the summer.

Books that might interest you ~

Square Foot Gardening by Mel Bartholomew
The Garden Primer (Revised) by Barbara Damrosch

Jonmichael planting his bean plant

Elise planting tomatoes

all planted

Monday, May 25, 2009

Strawberry Cobbler ~

Strawberry Cobbler

This weekend I tried a new recipe from the Strawberries we had left over from last weekend's picking . . . it was so good, you have to try it!

4 Tbsp butter
3/4 c. all-purpose flour
3/4 c. sugar
1 teas baking powder
1/4 teas salt
3/4 c. milk
2 cups sliced fresh berries
1 Tbsp sugar

Adjust oven rack to upper-middle position, and preheat oven to 350 degrees.
Put butter in pie dish and set in oven to melt. When butter has melted, remove pan from oven. Whisk flour, 3/4 cup sugar, baking powder, salt in small bowl. Add milk; whisk to form a smooth batter. Pour batter into pie dish over the melted butter, then scatter fruit over batter. Sprinkle with remaining 1 Tbsp sugar. Bake until batter browns and fruit bubbles, 50-60 minutes. Serve warm or at room temperature with a dollop of whipped cream or a small scoop of vanilla ice cream, if desired.

Strawberry Cobbler

Monday, May 18, 2009

Strawberry Jam

Strawberry Jam - look at all that red!

I have never minded the work involved in preserving food in such an old fashioned way. The excitement of steralized jars in my kitchen ~ the first canning has begun with the strawberries we picked on Saturday and by Saturday night the process was finished, only to be greeted by a hungry family Sunday morning for breakfast. It was all worth the effort indeed!

The recipe as promised:

Strawberry Jam

6 cups of cored strawberries
4 cups sugar
1 ½ packages Sure-Jell
1.5 lemons squeezed
Lemon zest

Mash and cook strawberries
Mix ¼ cup sugar with 1 ½ packages of Sure-Jell – add to strawberries
Add lemon juice and zest
Bring all this to a boil

Add remaining 3 ¾ cup sugar
Bring back to boil
Skim off foam

Funnel into sterilized jars, put on lids
Put jars in water bath for 5 minutes

This should yield 6 jelly sized jars.

Enjoy! ~

Saturday, May 16, 2009

I picked, she ate

picking strawberries

It's Strawberry picking time again {I love this time of year!}. Today we ventured out to a local patch and picked around 9 pounds of berries. Actually . . . we bought 9 pounds of berries. I can't tell you how many pounds we picked because the more I picked, the more Elise ate. So there you go. I had big plans for these berries . . . here are some images from our day and a new friend we met.

strawberry Field

making a friend

eating Strawberries

picking the last few

And tonight, I spent a lot of time in the kitchen doing this . . . I'll share more tomorrow including my recipe.

coring strawberries

canning jam

Friday, May 8, 2009

something for everyone ~

through the pencils

Sometimes finding something for everyone in the house to do at once can be quite a challenge. On this day, I was able to find something, just the right thing in fact, for Lena to do. Getting a head start on some Mother's Day crafting, she was able to enjoy some quiet time in my room, on a day when I needed some extra rest and we were able to still enjoy some special time together.

making her creation

By the way, I love these art boards!! They make it so easy to take art wherever we need a table to go!!

finishing up

Wishing all you moms a very special Mother's Day weekend!!!

Friday, May 1, 2009

flour belly ~

flour belly

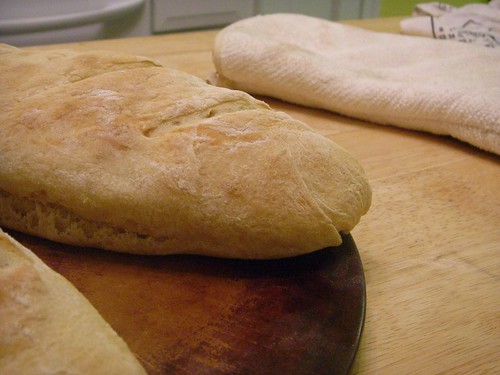
Okay, my bread baking has officially started. If I make something twice in a row, I know it is more likely to become a habit in my kitchen, especially if I start seeing better results with each making. First time go round, I wasn’t too pleased with my efforts, but with the way my family reacted, I knew I had no choice but to make more bread to make them happy! Also, I really did want to become better at it. Last night was my 2nd attempt. I immediately saw that my dough was better, right off the bat, and I didn’t have to add as much flour while kneading as I did the first go round. I saw this bread being made on You Tube, you can find the video here. It was humorous, but it was what I needed, simple, to get me started. Once thing I changed this time, is when I made the dough sponge, I wisked it up a bit to make it frothy, I had read in The Bread Bible that it would make the bread lighter. But all in all, this really is a simple bread recipe.

kneading

Dough Sponge
1/3 cup flour
1 ½ cups hot tap water
1 packet yeast
1 teaspoon sugar or honey

Wisk and sit 10-15 minutes (or while you tuck the kids into bed like I did)

Mix in:
1 teaspoon salt
1-2 teaspoons oil
3 cups flour gradually

Mix together in bowl until dough is sticky and stingy
Take and knead on floured surface 8-10 minutes

Once you have a nice, smooth, springy mass of dough, oil bowl and place dough in bowl.
Let rise 1-2 hours or until doubled.
Stick finger in, should leave hole when it’s ready.

Cut in ½, knead loosely and shape into elongated shapes.

Bake 20-30 minutes on 350. Let cool 10 minutes.

fresh loaf